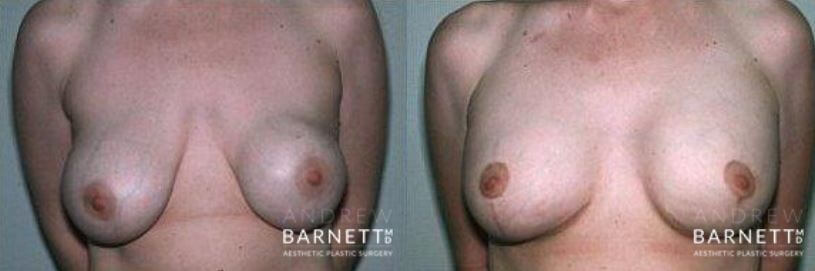
: Before & After Photos

Surgeries performed by certified American Board of Plastic Surgery renowned surgeon Dr. Andrew Barnett, San Francisco, CA

Patient 1

Patients often ask what the best products are to cover bruising on the face, neck, and eyes. We don’t sell or endorse any one brand but there are many effective reasonably priced color correcting concealer products available online and in the makeup section of drug stores. Before you buy any color correcting bruise concealer (its best to do this prior to surgery), it is important to know what to look for, what will work and why. I’ll walk you through the basics in this blog, and provide a cheat sheet in the next blog

HOW LONG WILL I BE BRUISED? WHAT CAN I DO TO REDUCE BRUISING? 

In my practice, we always advise patients to expect bruising for 10-14 days after any surgery. I require that all patients stop using any medications, herbs, and supplements that act as blood thinners 3 weeks prior to surgery because they can lead to more bleeding during surgery and more bruising postoperatively. I also use very highly skilled surgical techniques to minimize the amount of post-op bruising and provide all facial surgery patients with an oral Arnica regimen to start 7 days prior to surgery. Even with these precautions, some bruising is expected.

HOW DO I COVER MY BRUISES AT HOME? 

Color correcting is a concealer technique used by professional makeup artists to improve uneven skin tone, cover blemishes and to contour facial features. Bruise concealing is a lot simpler but relies on the same basic concept – using the color wheel to determine which concealer color will neutralize your bruise.

When choosing a color-correcting concealer product, keep in mind that your bruising will change color over time. Consequently, you need to purchase a small concealer palette with multiple corrective colors, rather than just one color. Your bruising will start out reddish and purple, then turn to brown and yellow before completely clearing.

LET YOUR INNER ARTIST SHINE! 

Many of my patients know that I am an artist (in addition to a plastic surgeon!) but you don’t have to be one to use the color wheel theory to choose a corrective color to cover your bruise. It’s very simple, colors that are opposite one another on the color wheel cancel each other out. See the bruise and color wheel below.

Post-Op Bruise Cover Up Walnut Creek

First, look at the bruise above – there are two colors – #1 is red-violet, #3 is yellow. The small picture shows how this bruise looks after concealer and foundation.

Now, look at the color wheel below.  To neutralize #1 red-violet, choose the color opposite on the color wheel – #2 or green – then put green concealer on the red-violet bruise.

Next, to neutralize #3 or yellow, choose the color opposite yellow on the color wheel – #4 or violet – and put the violet concealer on the yellow bruise.

There are some slight variations so a little blending (which can easily be done on the back of your hand) may be necessary.

Finally, when the concealing color is applied, finish off by applying a powder on top of the concealer. The powder should match your normal unbruised skin tone. You’re done!

WHAT DO I NEED TO COVER MY BRUISES? 

Supplies

  • 6 color concealer palette – NYX makes one you can get at the drug store with yellow, green, purple, pink, peachy orange and tan. The drug store brands seem to perform as well as professional brands.
  • One makeup brush – firm – You will need a small round inexpensive makeup brush that is firm rather than soft and fluffy. (Tip: you can actually just use your middle finger to dap the concealers on if you don’t have a makeup brush.)
  • Two makeup sponges – For blending. Available at most drug stores.
  • Makeup foundation – That matches your normal skin tone – applied over the neutralizing concealer and blended into the non-bruised skin.

APPLICATION TECHNIQUE – NEUTRALIZE THEN BLEND 

The technique is very simple. Just refer to the color wheel and cheat sheet below for color guidance. Gently wash your face with a gentle cleanser first and apply a thin layer of moisturizer to the areas of the face you will be applying the concealer. Be careful not to put moisturizer or makeup directly on your stitches or incisions. If you have had eyelid surgery do not put any makeup or concealer on your upper lids due to the incision in the crease of the lid. Also, be very careful if you have had a lower eyelid lift not to put concealer too close to the thin incision just under the lower eyelashes.

Step 1 – Neutralize the color – To start concealing your bruises choose the appropriate hue for your individual bruises and apply the corrective colors with the small firm makeup brush or use your middle finger as an applicator. Either way, patting it on is the easiest technique. If you need to blend colors to get the right hue, the back of your hand works great as an artist’s palette. Using the back of your hand this way also allows you to control how much color you end up applying to your face. If you’ve got too much concealer on either the brush or your finger you can dab a bit off onto the back of your hand before touching down on your bruise.

You don’t want to glob it on – rather dab to slowly build the color up. You may need to go over it more than once to create the corrective illusion. Once you feel the bruised color is neutralized, pat it with the first makeup sponge to blend and actually lift some of the product off so it is not too thick or gloppy on the skin.

Step 2 – Blend with foundation – To blend, lightly pat your regular foundation over the concealer as well as on to the rest of your face. Using the second clean makeup sponge, gently blend the foundation until you create a natural, even-looking skin tone. It may take a little practice but don’t get discouraged – you will have plenty of post-op time at home to work on perfecting your technique. You can wash it all off and do it again if you’re not happy with the result the first time.

Don’t hesitate to ask any questions about how to deal with your post-operative bruising at your pre-op appointment. Laurie, my patient counselor, will be happy to help you prepare for this part of your recovery.

CHEAT SHEET FOR CONCEALING BRUISES AT HOME

Dr. BarnettGreen Concealer is the opposite from red on the color wheel so it will hide redness and more red bruising

Dr. BarnettYellow Concealer is the opposite of purple and works for correcting purple bruises

Dr. BarnettPurple or Lavendar Concealer is the opposite of yellow and will correct your bruises as they start to turn more yellow toward as you heal

Dr. BarnettOrange Concealer is the opposite from blue and works well with darker skin tones to conceal blue under eye circles

Dr. BarnettPink Concealer works for people with lighter skin tones to neutralize blue toned bruises. Pale pink works better on fair skin, a salmon or peach tone will work better on medium skin. You can blend these on the back of your hand from a mix or red, orange and yellow if your palette doesn’t contain the right hue

If you have very dark skin all the same principles above will apply but you may need to purchase a concealer pallette with darker hues. (NYX brand has different concealer pallets for light and dark skin.)

TAKE THE NEXT STEP

Ready to look and feel your best? Schedule a consultation with Andrew Barnett M.D. to discuss your options today. Consultations are available in both our San Francisco and Walnut Creek offices. You may schedule for either location by calling (415) 879-8735 or through our website – www.drbarnett.com. Renee or Laurie will help you and answer any pre-consultation questions you may have!

Dr Barnett was amazing in every way. Before my surgery, during and then post. He was supportive, knowledgeable and so kind. I recommend him highly

View More Patient Reviews

Post-Op Bruise Cover Up Tutorial - Blog

Male

Individual results may vary.

Click here to contact Dr. Andrew Barnett and set up a consultation.

Patient 2

A facelift can safely and effectively improve your appearance by reducing or eliminating sag, wrinkles, fullness in the neck, and other signs of aging. Many of our patients want to look and feel their best before a big event. With proper planning and preparation, you’ll be able to facilitate a smooth recovery so you can look and feel your best with minimal time away from work, and interference with social events.

As a board-certified surgeon, I’ve helped numerous men and women achieve lasting results with limited pain, scarring, and downtime. Recovery is variable from patient to patient and is influenced by many factors.  While there are no absolutes, having performed many thousands of facelifts, I have a good idea about what you can expect during your recovery. Let’s take a closer look at how long it will take you to become fully camera-ready.

Facelift Walnut Creek

*Individuals Results May Vary

Facelift Recovery: Day One

During surgery, I use a specialized technique known as a two-layer facelift. Although it takes slightly more surgical skill, the two-layer technique allows for maximum results and a natural-looking outcome. The two-layer technique, despite taking more time than the single-layer technique, shortens the recovery period.   Following surgery, you will be staying in the hospital for one night following your procedure and will be attended to by a private duty nurse.  She has worked with me for many years and follows a protocol of cooling the surgical areas to reduce swelling and bruising. Please note, you will need someone to drive you home and while not essential, it is always a good idea to have someone with you for 24-48 hours.

Facelift Recovery: The First Week

You’ll likely feel swollen and tight for the first week or two. A pain medication prescription is provided in order to keep discomfort levels down. Every patient is unique in their pain tolerance, therefore your pain management plan will unique to you. During the first week, rest and recovery is your primary goal. You should refrain from any strenuous activity during this period and minimize head motion. Remember not to push yourself too hard too quickly following surgery.

An appointment will be scheduled within 4-6 days following your surgery.  We’ll discuss the recovery process in detail before your surgery, but I will review your progress and present you with a custom set of instructions at the first visit to guide you and shorten your recovery.  At this visit, I will remove most of your stitches.

Facelift Recovery: Two Weeks In

Swelling and bruising will be present up until week two and should not cause concern. Residual swelling may be present for up to several months following the procedure, although it is fairly subtle after the first two weeks. In most cases, you’ll start looking and feeling better allowing you to enjoy more social activities. 

Depending on the type of work you do, most patients feel comfortable returning to work after 10-14 days. You’ll be allowed to return to the gym at one week but your activities will be limited.  By two weeks you’re able to lift light weights and do aerobic activities, but no straining, head down, or high impact. Incorporating more strenuous tasks is generally okay towards the third week of recovery.

General Facelift Recovery

You’ll continue to see gradual improvement as any residual post-operative swelling subsides. In general, the results from your facelift will look very good after about 1-month and you’ll look your best at 6 months.

A facelift can produce long-lasting results for years to come. And while everyone has a unique aging process, many of my patients don’t feel they need more work for 12-14 years.

Facelift Consultations Available

Request A Consultation

How Far in Advance of a Big Event or Wedding Should I Have a Facelift?

Even though desired results can often be achieved, having plastic surgery less than 1-month before a big event (like a child’s wedding) is not typically recommended. That’s because physical downtime and social downtime are two different animals. The best time to have your surgery is at least 6-8 weeks before any social event. However, you’ll also need to consider the time it takes to go through the consultation phase and actually schedule your surgery.

I often suggest considering having your surgery done as soon as possible to ensure an optimal, stress-free outcome. At the time of your in-person consultation, we’ll discuss every aspect of your upcoming procedure more in-depth. Each facelift is highly customized according to your facial anatomy, specific concerns, and ultimate goals. In some instances, combination procedures, such as facial fat grafting or a brow lift, may be suggested for more dramatic results.

Great, great and great. Dr Barnett is an artist. I trust his work and judgement. He knows how to turn your clock back naturally. The absolute best

View More Patient Reviews

Take the Next Step

Ready to look and feel your best? Schedule a consultation with Andrew Barnett M.D. to discuss your options today. Consultations are available in both our San Francisco and Walnut Creek offices. You may schedule for either location by calling (415) 879-8735. Renee or Laurie will help you and answer any pre-consultation questions you may have!

How Long Does It Take to Look Normal After a Facelift? - Blog

Male

Individual results may vary.

Click here to contact Dr. Andrew Barnett and set up a consultation.

Patient 3

Breast Lift Walnut Creek
Images Contain Nudity – Discretion Advised

*Individuals Results May Vary

What Can A Breast Lift Accomplish?

No two breast lifts are performed exactly the same for every woman. The procedure is highly individualized based on your concerns and goals. Once we’ve determined what you’d like to accomplish, I’ll create a custom treatment plan that can restore a youthful appearance that will give you the best breasts of your life.

As a board-certified surgeon, I routinely perform breasts lifts to;

The improved outward appearance of your new breasts is just one benefit of breast lift surgery. Many women find themselves enjoying an improved self-image and a boost in self-confidence after breast enhancement procedures.

Breast Lift: Recovery and Results

A breast lift is generally done on an outpatient basis. I typically recommend taking at least 7 days for rest and relaxation before slowly resuming a normal activity schedule. Afterward, you can start to incorporate non-strenuous activities as you see fit. More strenuous tasks like exercise should be put on hold for at least 2-3 weeks. Although you’ll generally feel pretty good around this time, full recovery can take 6 weeks.

While the improvement is immediately apparent following surgery, the breasts need to settle and the swelling needs to disappear.  Finally, the scars from the surgery will fade. There are changes for up to 2 years following the surgery.

Breast Lift Consultations Available

Request A Consultation

Am I A Candidate for a Breast Lift?

If you would like to restore a perkier, more youthful appearance to your breasts, you may be a suitable candidate for the procedure. Women considering breast lift surgery should be in otherwise good general health with realistic expectations.

I generally recommend putting any breast enhancement procedures on hold until after you’ve had completed having children since pregnancy following a breast lift can significantly impact the results of your procedure. It’s important to note, a breast lift cannot dramatically change the size of your breasts.

For the best possible outcome, I almost always suggest pairing breast implants, even a very small implant, with your lift.  Doing so can address pregnancy and/or age-related volume loss. At the time of your initial consultation, we’ll discuss all of your options more in-depth so you can make an informed decision about what’s right for you.

I cannot express how thrilled I am with Dr. Barnett and my recent breast reduction and lift. He is a true artist! Dr. Barnett explained my procedure clearly, followed up every day during my first week of recovery and the results could not be better! His staff and surgical team are top-notch. I am very grateful to Dr. Barnett and recommend him highly! Anyone considering a breast reduction should not hesitate. It took me 25 years to finally do this for myself and I’ve never been happier. But….having Dr. Barnett do this surgery is a must!

View More Patient Reviews

Take the Next Step

Ready to look and feel your best? Schedule a consultation with Andrew Barnett M.D. to discuss your options today. Consultations are available in both our San Francisco and Walnut Creek offices. You may schedule for either location by calling (415) 362-1221. Renee or Laurie will help you and answer any pre-consultation questions you may have!

*Individual results may vary.

What is a Breast Lift? - Blog

Male

Individual results may vary.

Click here to contact Dr. Andrew Barnett and set up a consultation.

Visit Us

Our goal is for you to leave our office with a memorable and enjoyable experience, which is why our welcoming and compassionate staff will do everything they can to make you feel right at home.

Call Us Text Us
ONLINE CONSULTATIONS